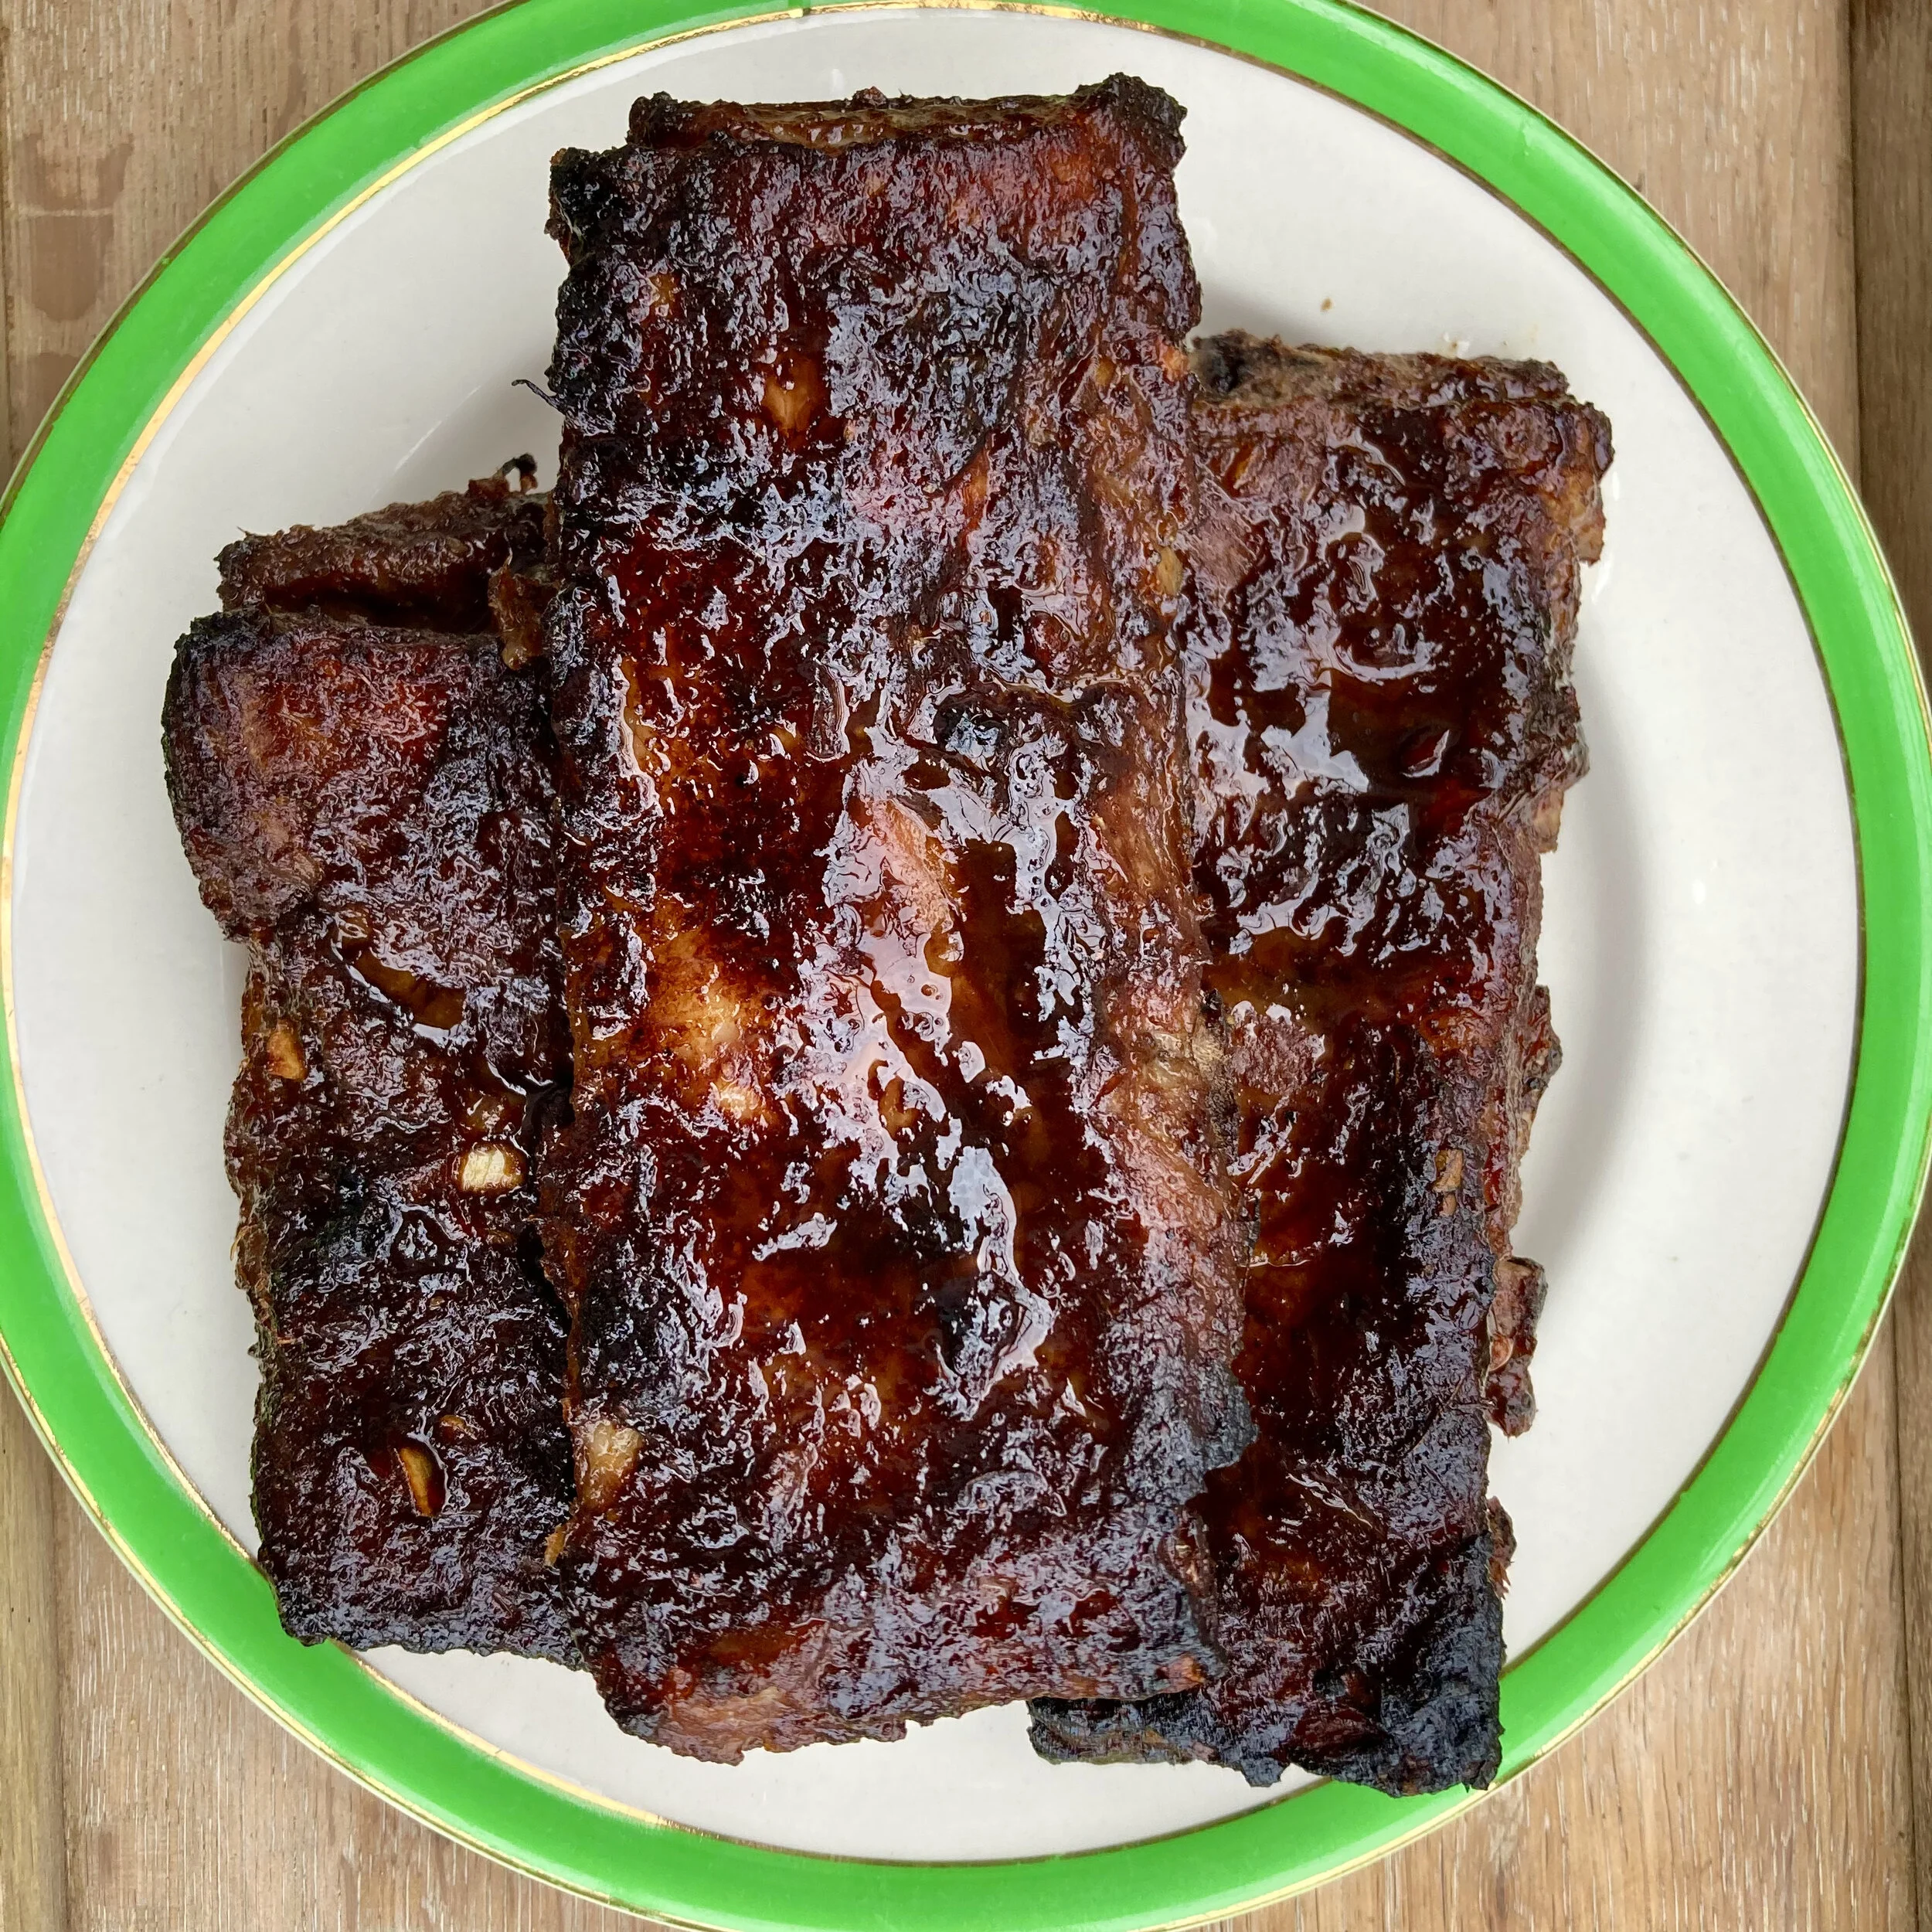
fig. a: Thai-style ribs
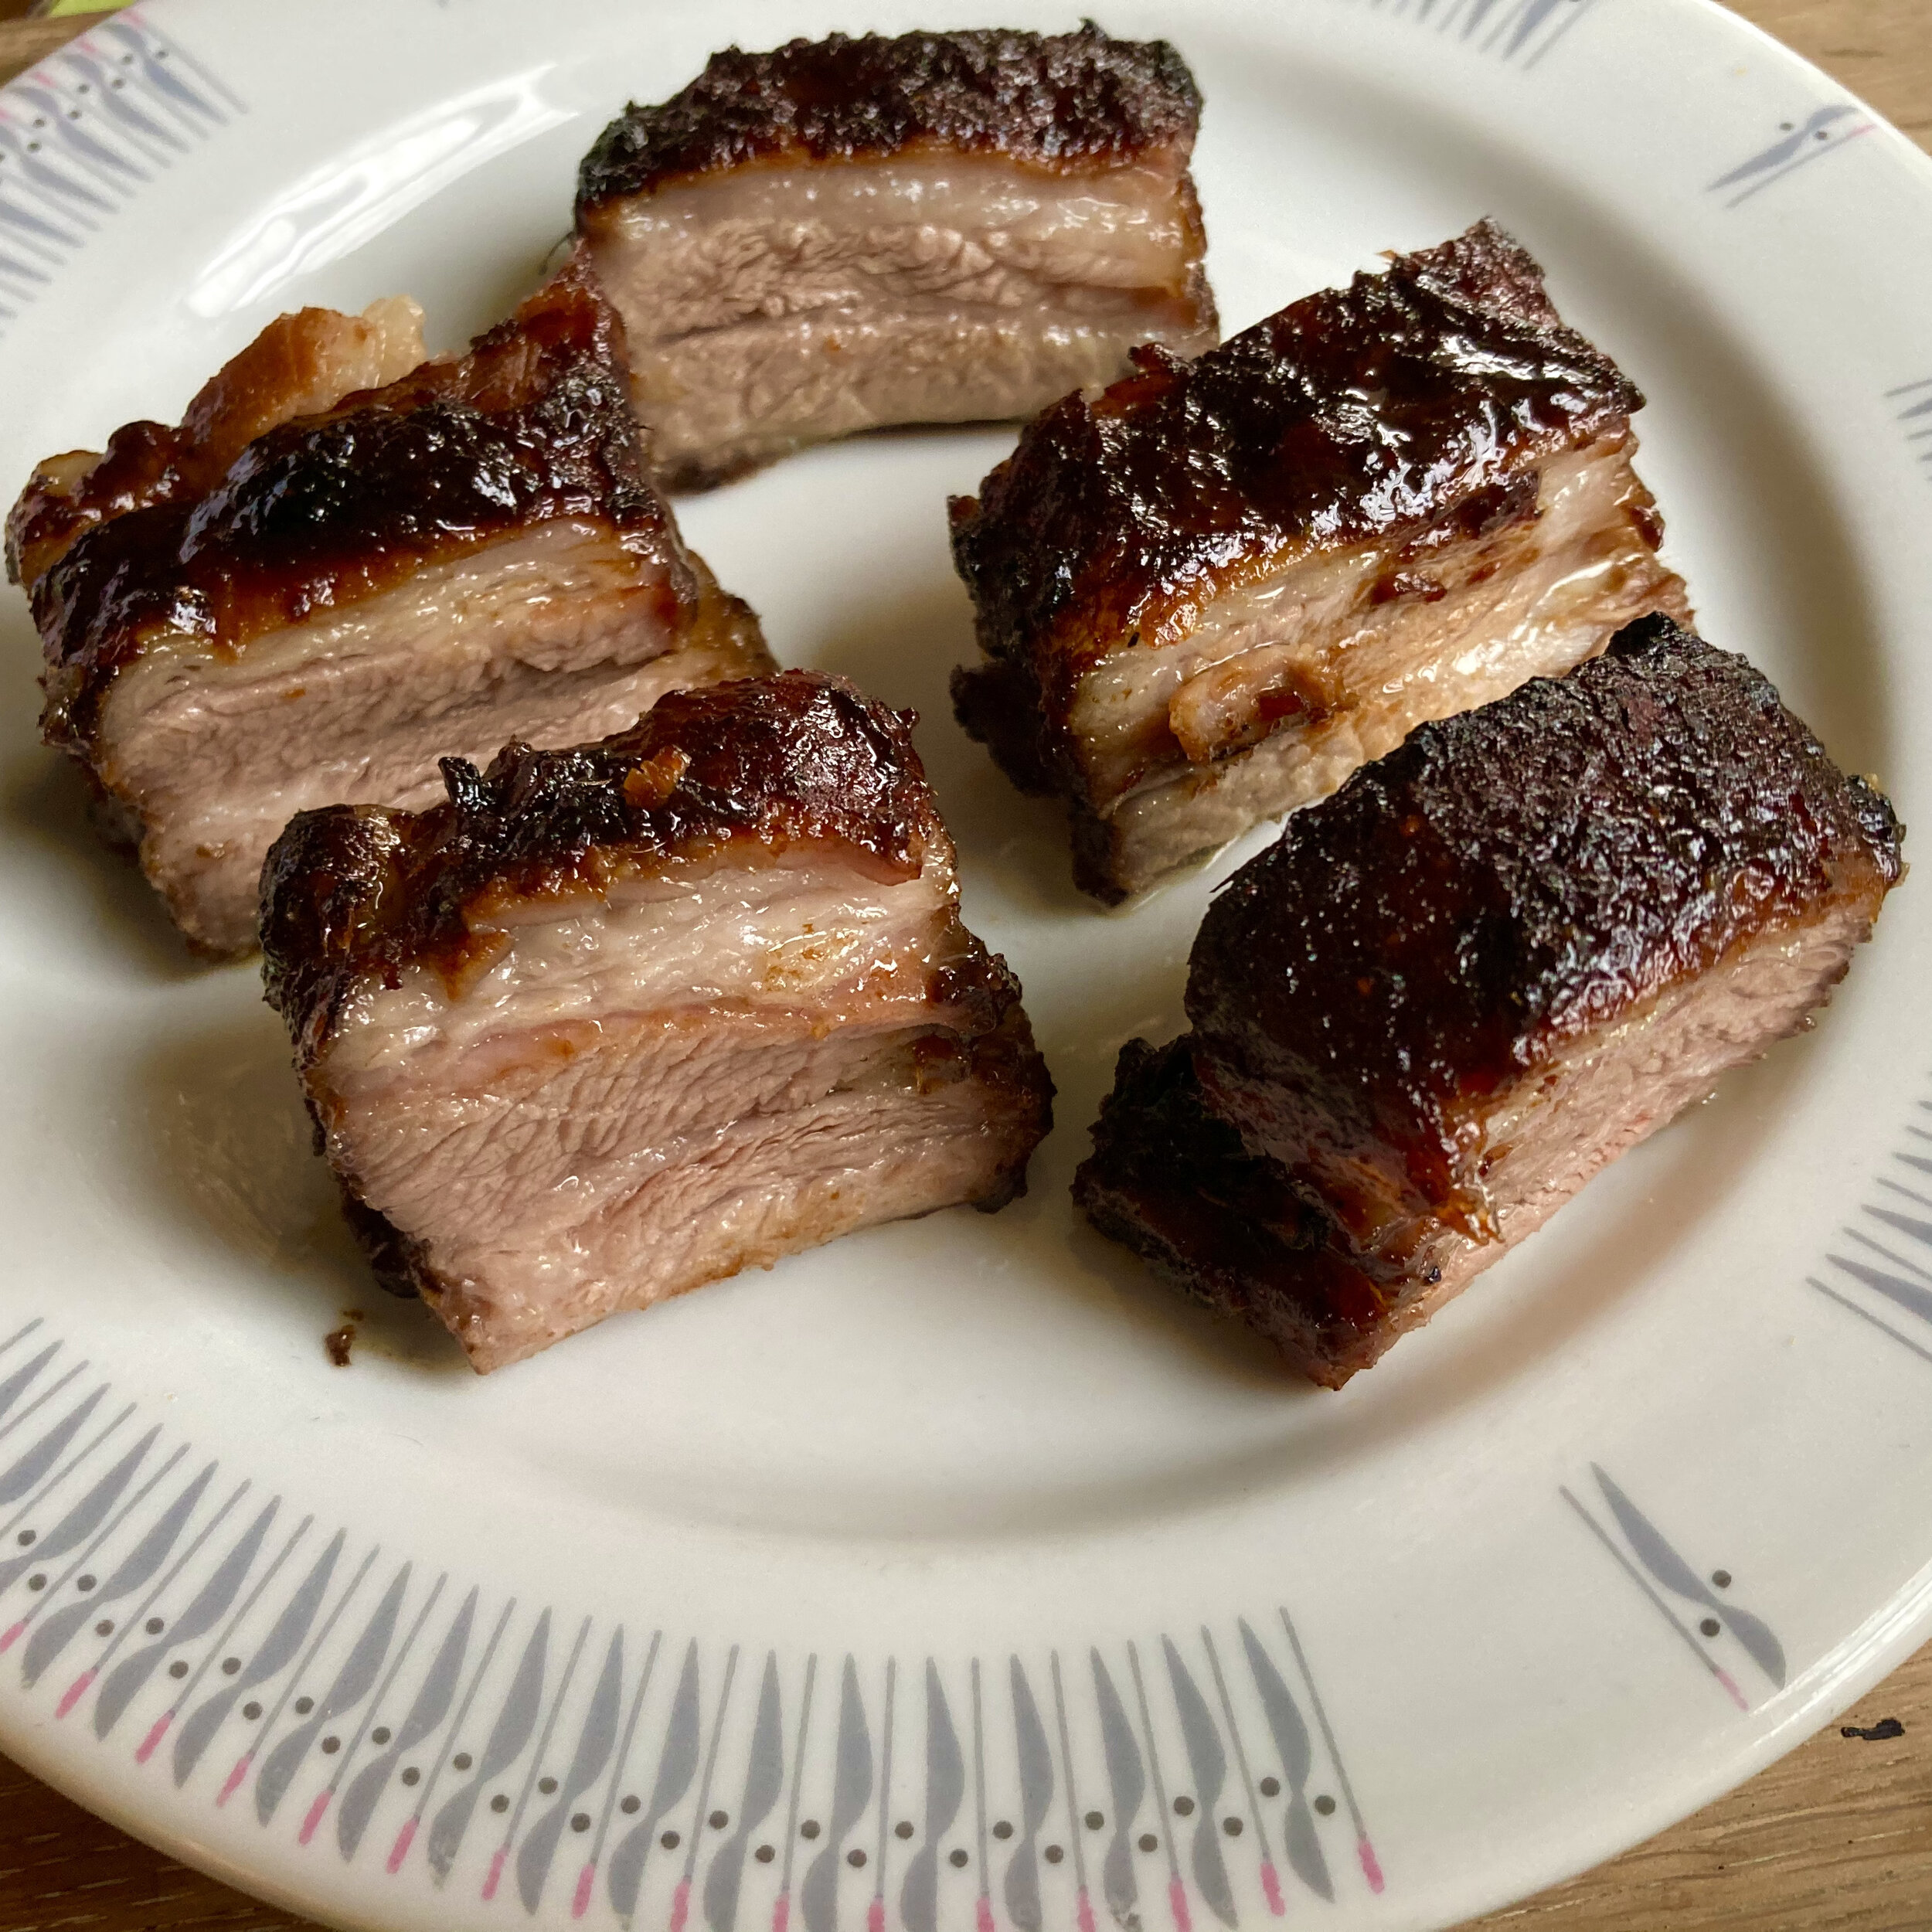
fig. b: Thai-style riblets (a.k.a., where the ice-cold beers at?)
Four score and seven years ago
These are the times that try men’s souls
There comes a time in every nordique grill fanatic’s life
There comes a time every winter, usually around February or March, when—in the words of the late, great Charlie Feathers—I can’t hardly stand it.
I’m crazy about grilling and smoking. I love cooking over a live fire. But my circumstances are such that doing so is pretty much impossible for several months of the year. A big part of the reason why is just climate, but the deciding factor is definitely living situation. Even if I wanted to brave the elements to do some winter grilling, my premises don’t allow it. I’m sure I’m not the only one. I’m sure there are plenty of you out there who understand my predicament and feel my pain.
In any case, come February or March (sometimes even earlier), the proverbial thrill of the grill really starts gnawing at me, and that’s usually around the time that I respond with one of my oven-roasted spare ribs recipes. It’s never quite the same as smoking them over a live charcoal fire, of course, but buy some nice meaty racks, coat them with a tasty rub, slather them with a wicked BBQ sauce, roast them real slow & low, and serve them with a little BBQ dip, and those ribs are as close an approximation of the pleasures of the grill as I’m likely to find until The Thaw occurs.
This year when that urge hit me I came across a recipe in the New York Times for oven-roasted ribs that was rather different than the Southern-style ribs I usually make, and I found myself entranced by what I read. The recipe was David Tanis’s riff on a Thai barbecued spare ribs recipe that first appeared in Andy Ricker’s Pok Pok cookbook back in 2013.
When Tanis’s version was first published in the summer of 2017, it was introduced as a recipe that was perfect for a scorching summer day. One of those days that’s so oppressively hot that you certainly don’t want to do a lot of cooking, and any cooking you end up doing needs to be easy. In this case, the idea goes as follows: having picked up some racks from your butcher and gotten her to saw them in half lengthwise, you marinate your ribs for a couple of hours, pop them into a low-temperature oven, retreat to an air-conditioned room (or the coolest room you’ve got) with a cold drink. Flip the ribs a couple of times (every 30 minutes or so), and an hour and a half later, your ribs are nearly done. Raise the heat in the oven briefly, paint them with your sauce, and ten to fifteen minutes later you’ll be rewarded with gorgeously lacquered Thai-style spare ribs—utterly “irresistible finger food,” as Tanis puts it.
Well, it turns out this recipe is equally good in the wintertime. In fact, it might even be better. I don’t know about you, but when it’s really, really hot, I’m not sure I want the oven on for two hours at all, even if it’s set at a low temperature. When it’s really, really hot usually all I want is salad, or conservas, or cold noodles. But in the doldrums of winter, when I can’t wait to get back on the grill, but I know that possibility is still weeks away? This recipe was truly phenomenal. It also proved to be highly versatile. I made sure to make plenty so that we’d have leftovers, and I ended up serving those leftovers a couple of different ways. More on that later, but for the moment let me just add one last ironic detail to this story: Tanis devised this as an oven-roasted recipe quite specifically because he didn’t want to grill outside—because it was too hot, and he’d already had a few occasions that summer where he’d decided to grill on a particularly hot summer day, only to regret it later. Needless to say, this is not a problem we’re experiencing right now here in Montreal.
Beyond the fact that it lent itself to oven-roasting, Tanis was originally drawn to the recipe because of its simplicity and its lack of pretence, and because of Ricker’s stubborn insistence that his ribs should be cooked relatively quickly. “Not falling-off-the-bone tender!”, Ricker emphasized. As Tanis explains this approach is the preference in Thailand. “Thai diners prefer ribs on the chewy side, with a little tasty, crunchy cartilage or gristle in the bargain.” Among other things, this means these ribs are quicker and easier to prepare than recipes that are ultra-slow & low.
The only thing that takes a little extra forethought is the marination phase. Following Ricker, Tanis recommends a minimum of two hours’ time for the ribs to get the benefits of their tantalizingly sweet and funky marinade. If you can marinate the ribs longer—a few hours, or even overnight—they’ll be even better.
And it was with the marinade that Tanis took just a couple of liberties: adding tamarind paste to offset the honey and up the funk factor, and a bit of extra chili to give the ribs a more pronounced kick. Ricker’s original recipe is Chinese-influenced. You’ll know what I’m talking about when you taste them. Tanis’s alterations—minor thought they may be—may not be 100% authentic (there’s a reason his recipe is titled “Thai-Style Spare Ribs”)—but they have the effect of making the ribs even more savoury, even more intoxicating, and somehow even more “Southeast Asian.”
As Tanis points out, the resulting ribs are so lip-smackingly delicious that they don’t require an additional dipping sauce when you serve them. But if you choose to whip one up—especially a spicy, garlicky Thai or Southeast Asian number—you won’t be disappointed. Quite the opposite.
Thai-Style Spare Ribs
2 racks of baby back ribs, 3 to 4 pounds, halved lengthwise to make 3-inch ribs (ask your butcher to do this)
2 tsp kosher salt
3 tbsp honey
2 tbsp soy sauce
1 tbsp tamarind paste
1 tsp toasted sesame oil
2 garlic cloves, minced
2 tbsp grated ginger
½ tsp crushed red pepper (preferably Thai)
½ tsp black pepper
¼ tsp cinnamon (preferably Vietnamese)
pinch of grated nutmeg
pinch of cayenne
2 tbsp Shaoxing cooking wine, mirin or sherry (I used mirin)
3 tbsp chopped garlic chives or scallions, for garnish
3 tbsp chopped cilantro leaves and tender stems, for garnish
Lay the ribs flat in a roasting pan, meaty side up. You will have 4 long pieces. Season lightly with salt on both sides.
Make the marinade: in a small bowl, combine honey, soy sauce, tamarind paste, sesame oil, garlic, ginger, red pepper, black pepper, cinnamon, nutmeg and cayenne. Add the wine and 1/4 cup hot water and whisk well.
Pour marinade over ribs to completely coat. Marinate at room temperature for 2 hours, turning once or twice, or cover and refrigerate for several hours or overnight, making sure to turn the ribs at least once or twice. (If you choose to marinate the ribs slowly in the refrigerator, just make sure to pull them out to temper them at least one hour (and preferably two) before roasting them.
Position a rack in the middle of the oven and heat to 250º F. Transfer the roasting pan, uncovered, to the rack. Roast ribs for 1 1/2 hours, basting with pan juices and turning ribs over every 20 minutes or so. If pan juices seem to be drying out or burning, add a little water to the pan.
Pour juices from the roasting pan into a small saucepan. Spoon off fat from surface of sauce, then simmer sauce for a few minutes until slightly thickened, then use the juices to paint the ribs.
Turn up oven the heat to 400º F. Return ribs to oven for 10 to 15 minutes, until nicely glazed.
Use a sharp knife to divide ribs, cutting between the bones. Pile ribs onto a platter, sprinkle with garlic chives and cilantro, and serve.
According to Ricker, “these ribs are often served in Thailand to accompany ice-cold beer,” as Tanis notes. Did you catch that? They’re a snack meant to accompany beer. The ice-cold beer is primary. The ribs are just an accompanying snack. Like salted peanuts. All I know is these ribs can be eaten as a snack or appetizer, and they are fantastic with especially cold beers.
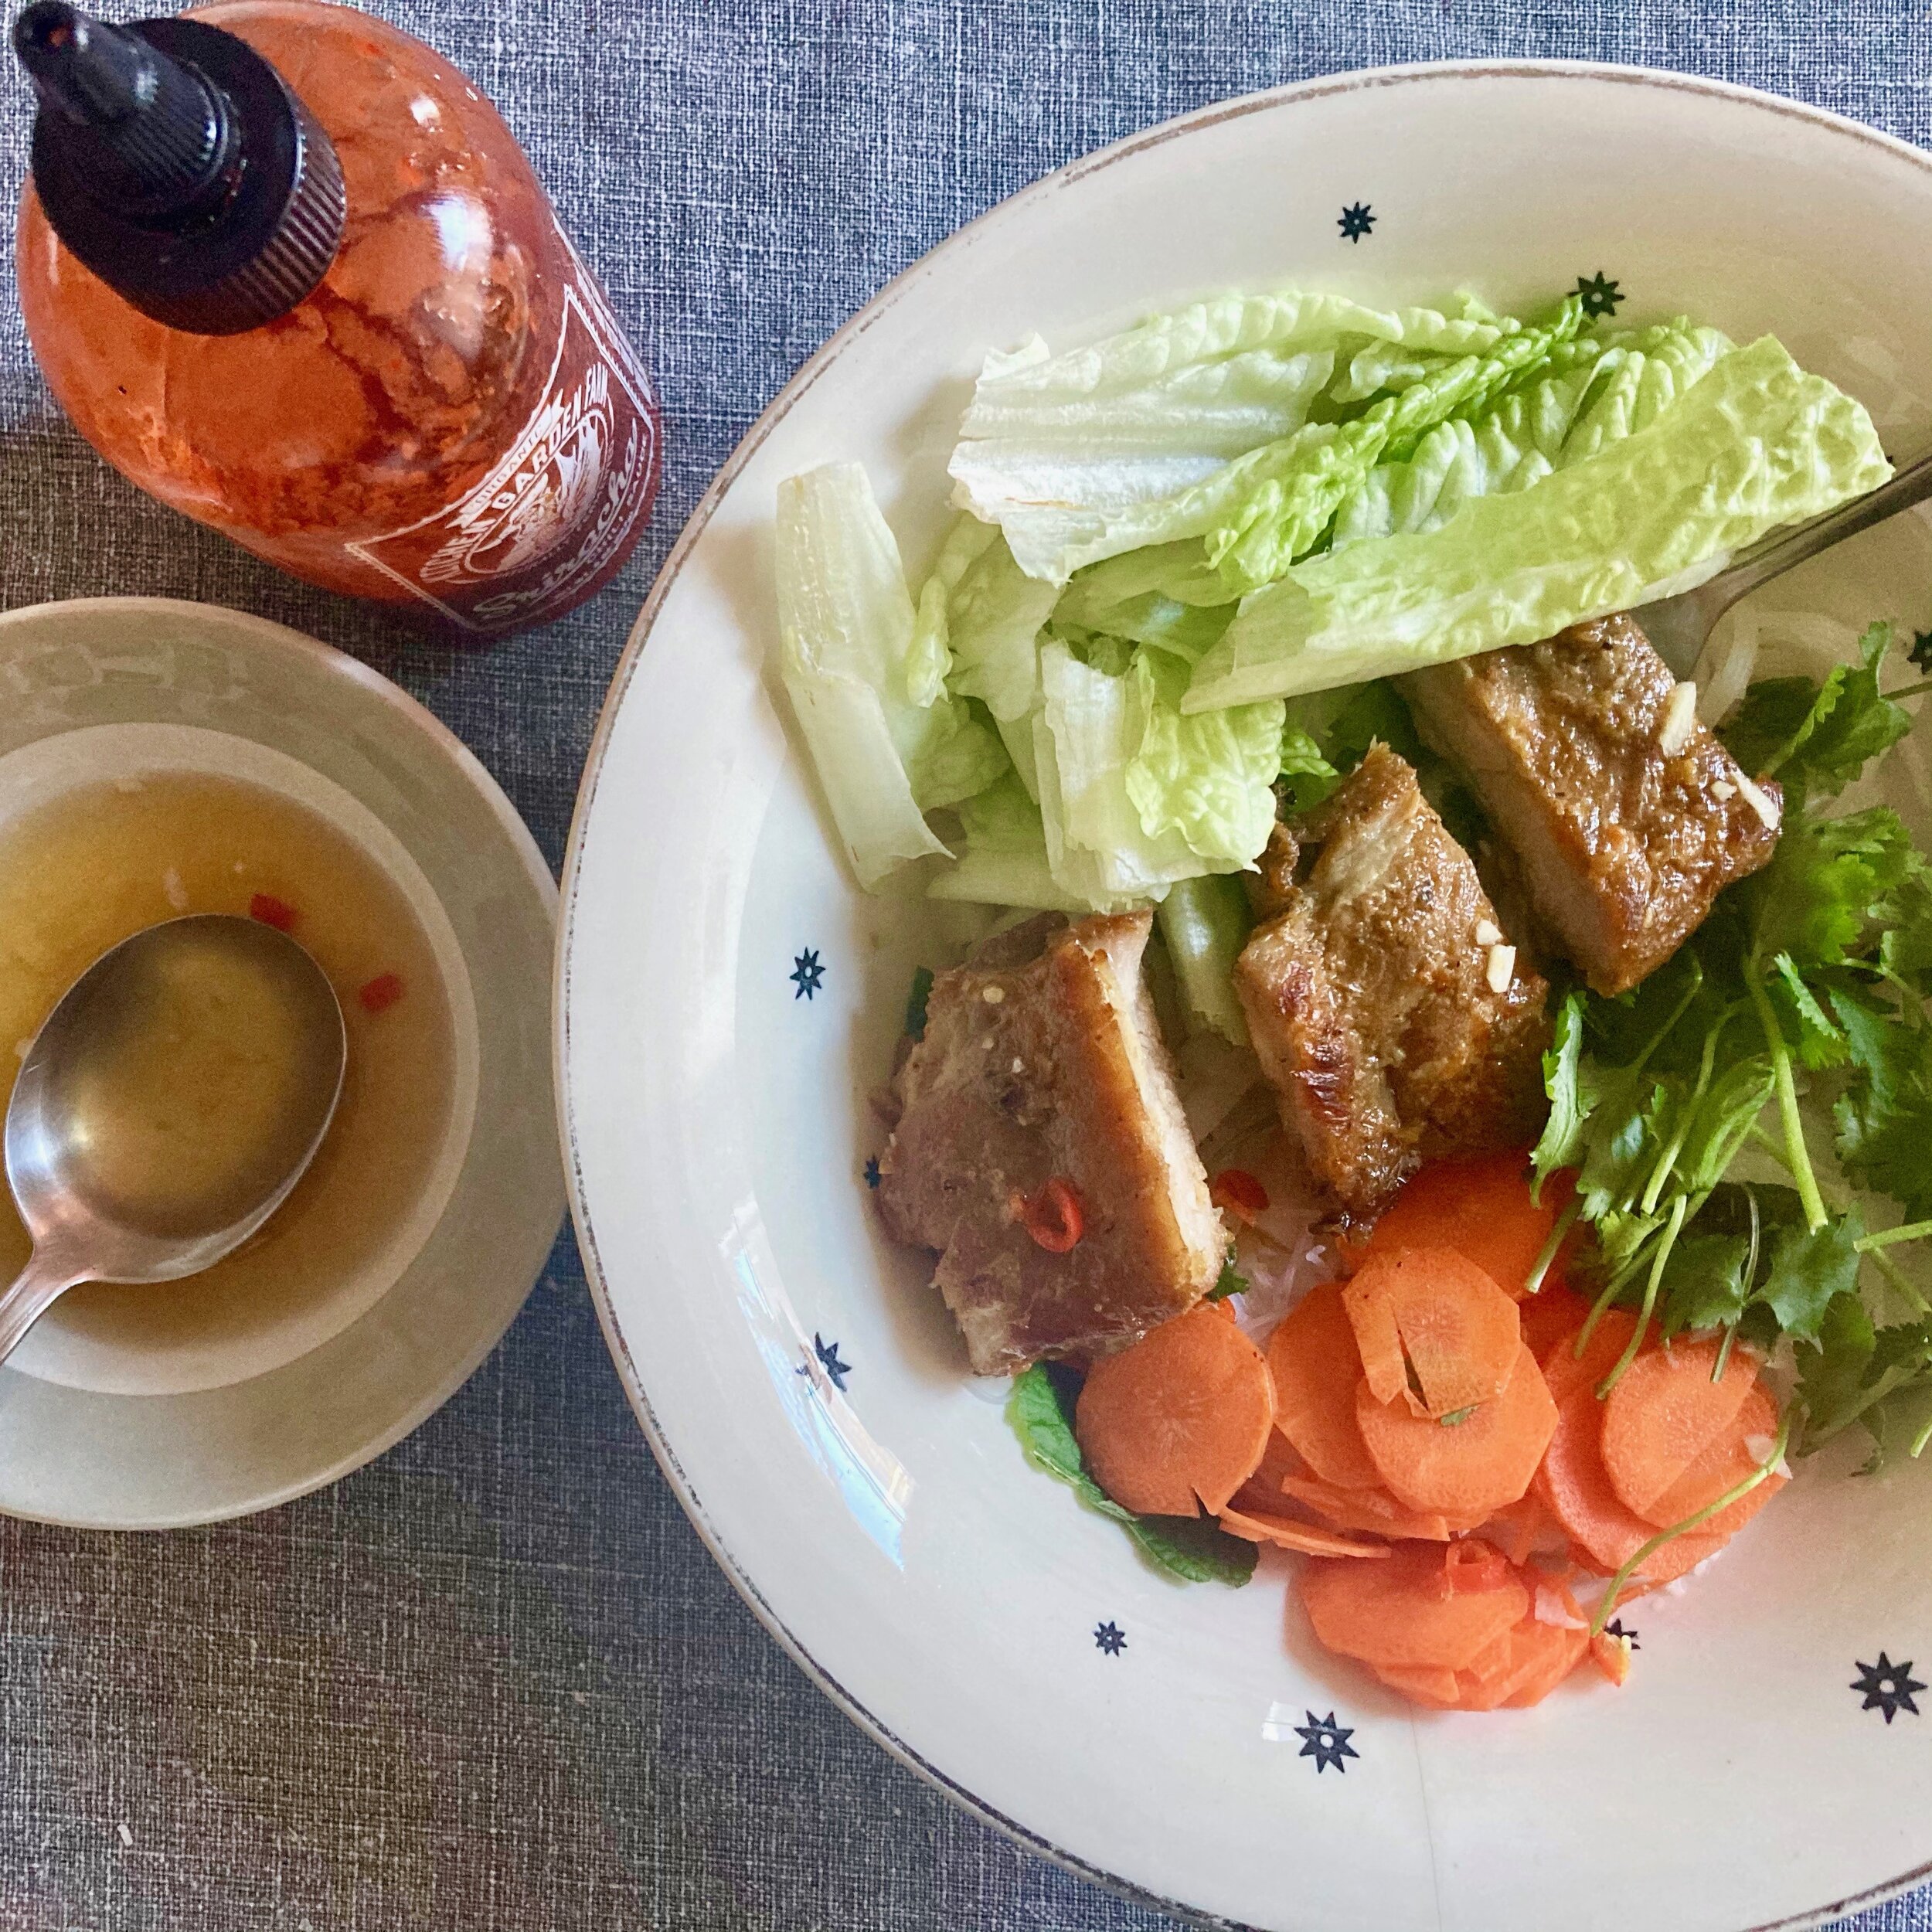
fig. b: bbq ribs & vermicelli noodles
I also know that when I served some of my leftover ribs over vermicelli noodles, with pickles, cucumber slices, lettuce, herbs, and nuoc cham, like some kind of Viet-style/Thai-style mash-up, it was exhilarating—easily the very best vermicelli noodle dish of its kind that we’ve ever made at home.

fig. c: chopped rib sandwich
And when I slathered a freshly-split baguette from our friends at Boulangerie Automne with parfait de volaille from our friends at Vin Mon Lapin, and then layered it with chopped BBQ rib meat, daikon and carrot pickles, lettuce, herbs (cilantro and mint), and a schmear of mayonnaise, it was the very best sandwich I’ve had in months—maybe years.

fig. d: anatomy of a chopped rib sandwich
So, yeah, enjoy these Thai-Style Ribs as a snack, with those ice-cold beers—by all means!—but don’t overlook their versatility.
aj